A Page template is a way to style a page in an unique way to create another type of style that is different from other pages.
It is located to the right of the content creation area of a page (new/edit page area). One has to have a minimum of one template available for the section to be seen. In the drop down you can select which Template to use for the specific page you are on.
It is up to the theme developer to include Page Templates. Some do others do not.
What you see in the above screenshot shows 3 templates I have created. Your dropdown will look different.
I will show you the process I went through to create the Page templates that I use.
Creating a WordPress Page template
Create a Child theme
But if you have not created a Child theme do so first.
This is how I made my Child theme based on the parent theme basic from themify.me:
I made a new folder and called it basic-child.
Then made a new file and named it style.css. The code inside of the style.css that I use is:
/*
 Theme Name: Basic Child
 Version: 1
 Description: Child theme for the basic theme
 Author: Paal Joachim
 Template: basic
 */
@import url('../basic/style.css');
The above is the base for a new Child theme that I created. Yours will have other names. You can also include a screenshot named screenshot inside the Child theme to see a screenshot in the Appearance -> Themes area. The Child theme is now ready to be activated.
Creating a Page Template
Inside the Child theme folder I made a new folder and named it page-templates to clearly show what the folder is meant for.
Made a new file. Page Templates begin with this section.
<?php
 /*
 Template Name: My Custom Page - name that you choose to call your template.
 */
The name of the template will also show in the Page Template drop down.
Save your new template as a php file with a name that explains what it is for. Go to a page edit/new screen or refresh the page. The new Page Template should now show up in your Template drop down list.
The themify.me Page Template
I posted in the forums at themify.me asking for an example of a regular/default themify page template, so that I had something to start from in creating my own template.
<?php
/*
Template Name: Regular template
*/
?>

<?php get_header(); ?>

<?php
/** Themify Default Variables
* @var object */
global $themify;
?>

<div id="layout" class="pagewidth clearfix">
   <div id="content" class="clearfix">
       <?php if (have_posts()) : while (have_posts()) : the_post(); ?>
           <?php if($themify->page_title != "yes"): ?>
              <h1 class="page-title"><?php the_title(); ?></h1>
           <?php endif; ?>
           <div class="page-content">
                <?php the_content(); ?>
                <?php themify_content_end(); // hook ?>
           </div>
      <?php endwhile; endif; ?>
    </div>
    <?php if ($themify->layout != "sidebar-none"): get_sidebar(); endif; ?>
</div>
<?php get_footer(); ?>
I began picking it a part.
get_header (reads the header.php file – the file contains information for the top menu, logo and site description. etc)
div layout
div content
checking for posts
Page title check. With a h1 tag.
div page-content
Sidebar check.
get_footer (reads the footer.php file – contains information for the footer of the site.)
Creating a Home Page Template
I plan on creating a new home page which will be similar to the below image which contains a header, main menu and a footer. Behind is a full screen image. It also uses an unique font in the footer area.
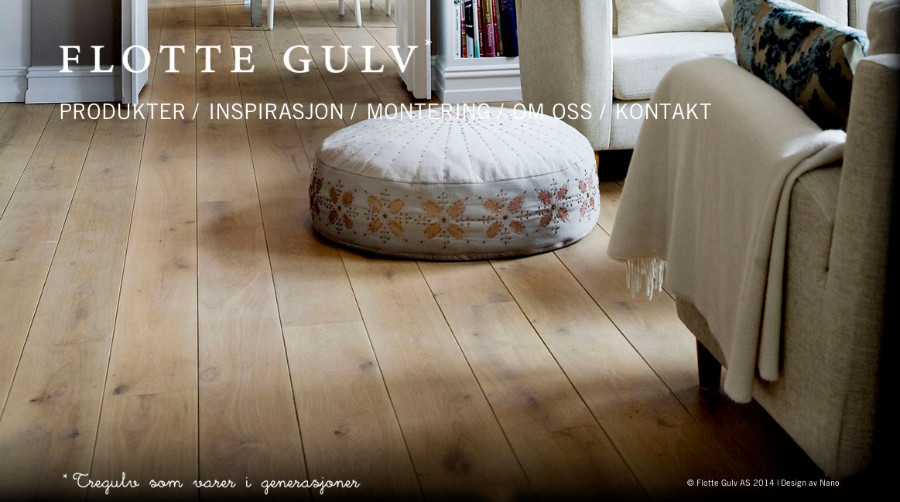
I took a copy of the existing default Page Template I had received and renamed the Template name to Home Page and saved the file as home-page-template.php into the page-templates folder.
Checked to see that it came up and yes it was listed in the Template drop down.
Inside the home-page-template.php
Renamed: <div id=”layout” class=”pagewidth clearfix”>
TO
<div id=”homelayout” class=”pagewidth clearfix” style=”height: 420px”>
Instead of using the layout used for all pages I renamed it to homelayout since it is the home page that will be using this template. I added a CSS style directly into the tag to force a height of 420px to the layout area. So the footer is on the bottom of the page not up high.
Adding a full screen image to the page template.
The first thing I want to do is create a full screen background image. This means that I need to place the image into the body CSS tag so the full screen is covered by the image. To make this happen I had to follow a few steps.
Inside header.php
I need to make sure that <body <?php body_class(); ?>> is mentioned in my header.php file. I went to my parent theme and copied the header.php file and added the copy to my child theme folder. Opened up the file and on line 23 of the header.php file that I use I noticed right below the end of </head> the <body <?php body_class(); ?>>. If it is not listed in your header file then just paste it in right below the /head.
Inspect Element
Open up the home page in your browser and right click and select Inspect Element (in Chrome, Firefox or Opera).
Check out what is says in the body class area. Mine said this:
<body class=”page page-id-5 page-template page-template-page-templateshome-page-template-php logged-in admin-bar skin-default webkit not-ie sidebar1 frontend customize-support” style>
Inside style.css
The first code I added to the style.css was the body tag with code from the above body class information.
body.page-template-page-templateshome-page-template-php {
   background: red;
 }
The full screen was now covered in the color red. I also used the home page template on another page to see if it also covered the screen in red and that it did.
A tip to only affect specific pages:
There is a way to only affect a specific page. Instead of using the body code above one can use. body.page-id-5. This goes for any CSS tag. For instance .page-id-5 #layout or .page-id-5 #header. This will only affect page id of 5 which in this case is the home page. To find the Page ID check the body tag through Inspect Element OR in the All Pages view hover the mouse of the page and check bottom left in the status screen to see what post=number it is.
Replacing color with image
Add a new folder to the child theme and name it images. In it I placed the image I planned to use to cover the home page.
I adjusted the code inside the CSS body tag:
body.page-template-page-templateshome-page-template-php {
   background: #682222 url(images/Flotte-Gulv.jpg) no-repeat center center fixed;
   -webkit-background-size: cover;
   -moz-background-size: cover;
   -o-background-size: cover;
   background-size: cover;
}
Background image CSS code was found here: https://css-tricks.com/perfect-full-page-background-image/
Adding custom fonts
Add a new folder and name it fonts.
To generate the code needed for the font go to: https://www.fontsquirrel.com/tools/webfont-generator
and upload your font(s). Download the zip file. Open the stylesheet.css and copy the code into your own stylesheet.
This is what it looks like after I also added in the link to the fonts folder and made sure that all of them have the same name.
little_days-webfont
/***************
Custom web font
***************/

@font-face {
    font-family: 'little_days-webfont';
    src: url('fonts/little_days-webfont.eot');
    src: url('fonts/little_days-webfont.eot?#iefix') format('embedded-opentype'),
         url('fonts/little_days-webfont.woff') format('woff'),
         url('fonts/little_days-webfont.ttf') format('truetype'),
         url('fonts/little_days-webfont.svg#little_daysregular') format('svg');

    font-weight: normal;
    font-style: normal;
}
Copy the four font files (eot, svg, woff and ttf) from the unpacked zip file to your fonts folder. Check the name of the fonts inside the fonts folder be sure that they also have the same name.
Resources:
https://wpsites.net/web-design/fonts-wordpress/
https://webdesign.tutsplus.com/articles/a-web-designers-guide-to-font-replacement-methods–webdesign-975
I adjusted the following:
– Removed all the widgets on the page. By selecting a no sidebar layout.
– Removed page titles by adding the following code to my CSS stylesheet.
.page-title {
  display: none;
}
– Added a header image into the images folder. Then added this code to my stylesheet.
– Removed a RSS and search box. (Do remember I am using the setup I have for my child theme. Yours will be different.)
– I had to push the footer downward as it came up too far. I opened the home-page-template.php file and where it said div id=”layout”
I switched it out to become <div id=”homelayout” class=”pagewidth clearfix”>
and then in my stylesheet added:
#homelayout {
height: 400px;
}
– I removed a footer border top white line and a header border bottom white line.
The finished result showing the Home page template is this:
<?php
/*
Template Name: Home Page
*/
?>
<?php get_header(); ?>
<?php
/** Themify Default Variables
 * @var object */
global $themify;
?>
   <div id="homelayout" class="pagewidth clearfix" style="height: 420px;">
        <div id="content" class="clearfix">
            <?php if (have_posts()) : while (have_posts()) : the_post(); ?>
               <?php if($themify->page_title != "yes"): ?>
                  <h1 class="page-title"><?php the_title(); ?></h1>
               <?php endif; ?>
               <div class="page-content">
                    <?php the_content(); ?>
                    <?php themify_content_end(); // hook ?>
               </div>
            <?php endwhile; endif; ?>
        </div>
        <?php if ($themify->layout != "sidebar-none"): get_sidebar(); endif; ?>
     </div>
     <?php get_footer(); ?>
</div>
Page template styling inside the style.css:
/***************
Home Template CSS
***************/

body.page-template-page-templateshome-page-template-php {
	font: .81em/150% Trade Gothic W01 Roman, Arial, Helvetica, sans-serif;
	word-wrap: break-word;
	color: #fff;

	background: #756049 url(images/Flotte-Gulv.jpg) no-repeat fixed;
	-webkit-background-size: cover;
	-moz-background-size: cover;
	-o-background-size: cover;
	background-size: cover;
	background-attachment: fixed;
}

/* white text logo */
.page-template-page-templateshome-page-template-php #site-logo {
	background: url(images/Flotte-Gulv-Logo-hovedside.png) !important;
	background-repeat: no-repeat !important;
}

/* white color menu items */
.page-template-page-templateshome-page-template-php #main-nav a  {
	width: 110%;
	text-align: center;
	text-decoration:none;
	display: block;
	font: bold 22px/1.2 Book Antiqua, Palatino Linotype, Georgia, serif;
	text-transform: uppercase;
	letter-spacing: 0.2em;

	margin: 15px 1px 3px 10px;
	padding: 0.4em;
	color: #fff;
	/* text-shadow: #000 1px 1px 1px; */

}

/* main level link :hover */
.page-template-page-templateshome-page-template-php #main-nav a:hover, #main-nav li:hover > a {
	color: #e7e5e5;
}

.page-template-page-templateshome-page-template-php #footer {
	background: url('images/site-desc-neg.png') no-repeat left top;
}

/************
H1 - H6
*************/

h1 {
	font-size: 4em;
	font-family: 'little_days-webfont';
	font-weight: 400;
	color: #fff;
	/* color: #8F6F7A; */
}

h2 {
	font-size: 2.5em;
	font-family: "little_days-webfont";
	font-weight: 400;
	color: #8F6F7A !important;
}

h3 {
	font-size: 2em;
	font-family: "little_days-webfont";
	font-weight: 400;
	color: #8F6F7A;
}
The WordPress codex for Page Templates explains it pretty well and in more detail.

