Do you want a chat bubble in WordPress but don’t need a full live chat service like Tawk.to or 3CX? Most chat plugins are either too complex, rely on third-party accounts, or add unnecessary bloat.
In this tutorial, I’ll show you how to create a lightweight chat-style bubble that opens a contact form. It looks and feels like live chat, but works entirely with your favorite form plugin (A regular Fluent Forms form, Contact Form 7, WPForms, Formidable, Gravity Forms, Ninja Forms or other).
I am using a Code Snippet plugin to add the code. The chat bubble is seen on every page.
The result:
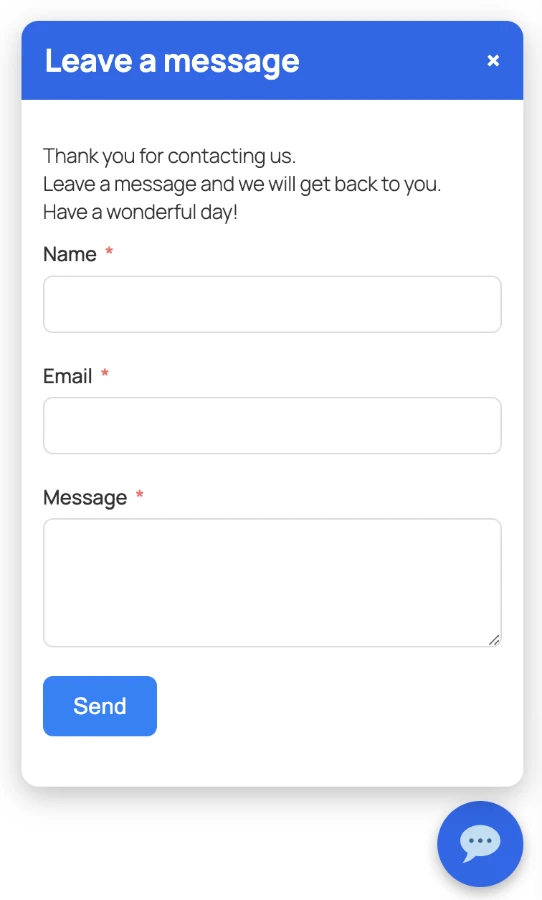
- A chat bubble in the bottom corner.
- When clicked, it opens a chat window with a message and a contact form.
- After submission, the form shows the usual “Thank you” message.
- When closed, the form resets for the next visitor.
Tip: How the chat bubble and form behave
When the user closes the chat bubble, the form and the intro message are automatically reset. This means that the next time someone opens the bubble, the form is empty and ready for a new submission, and the intro text is visible again. This helps keep the chat interaction clean and prevents old data from being accidentally submitted twice.
If you’re using a different form plugin than Fluent Forms (for example Contact Form 7, WPForms, Gravity Forms, or Ninja Forms), you can replace the Fluent Forms listener in the code with the plugin-specific listener shown in the tutorial.
For plugins that are not listed, there’s a generic fallback listener included. This listener ensures that any form inside the chat bubble — even from an unlisted plugin — will hide the intro message when submitted. This makes the code flexible and easy to use no matter which contact form plugin you choose.
Step 1 – Install Your Form Plugin
Create a simple contact form (Name, Email, Message). Copy the shortcode for later.
Example using a regular Fluent Forms form. (Not conversational form.)
[fluentform id="1"]Step 2 – Add the Chat Bubble Code
I will use a Code Snippets plugin and add the following PHP code with focus on Fluent Forms. If adding into a theme functions file or using another form plugin check further below.
Here’s the code:
// Lightweight chat bubble with form (Fluent Forms example)
add_action('wp_footer', function () {
?>
<style>
/* Chat bubble styling */
.custom-chat-bubble {
position: fixed;
bottom: 20px;
right: 20px;
background: #2563eb;
color: #fff;
border-radius: 50%;
width: 60px;
height: 60px;
display: flex !important;
align-items: center;
justify-content: center;
font-size: 28px;
cursor: pointer;
box-shadow: 0 4px 10px rgba(0,0,0,0.3);
z-index: 9999;
transition: background 0.3s;
}
.custom-chat-bubble:hover { background: #1e40af; }
/* Chat window styling */
.custom-chat-window {
position: fixed;
bottom: 90px;
right: 20px;
width: 350px;
max-width: 95%;
background: #fff;
border-radius: 12px;
box-shadow: 0 6px 20px rgba(0,0,0,0.25);
display: none; /* hidden by default */
flex-direction: column;
overflow: hidden;
z-index: 10000;
}
.custom-chat-window.active { display: flex; }
.custom-chat-header {
background: #2563eb;
color: #fff;
padding: 12px 16px;
font-weight: bold;
display: flex;
justify-content: space-between;
align-items: center;
}
.custom-chat-header span { cursor: pointer; font-size: 20px; }
.custom-chat-body {
padding: 15px;
font-size: 14px;
color: #333;
max-height: 450px;
overflow-y: auto;
}
.custom-chat-body p { margin-bottom: 10px; }
</style>
<!----------- Chat bubble --------->
<div class="custom-chat-bubble" id="customChatToggle">💬</div>
// Use: 💬 instead if the Code snippet plugin strips the emoji icon.
<!---------- Chat window ---------->
<div class="custom-chat-window" id="customChatWindow">
<div class="custom-chat-header">
Leave a message
<span id="customChatClose">×</span> <!-- Close button -->
</div>
<div class="custom-chat-body">
<!-- Intro text above form -->
<p id="chatIntro">
Thank you for contacting us.<br>
Leave a message and we will get back to you.<br>
Have a wonderful day!
</p>
<!-- Form container - Add the Fluent Form ID you plan to use-->
<div id="formContainer">
<?php echo do_shortcode('[fluentform id="10"]'); ?>
</div>
</div>
</div>
<script>
document.addEventListener("DOMContentLoaded", function () {
const toggle = document.getElementById("customChatToggle"); // Chat bubble
const windowBox = document.getElementById("customChatWindow"); // Chat window
const close = document.getElementById("customChatClose"); // X button
const chatIntro = document.getElementById("chatIntro"); // Intro text
const formContainer = document.getElementById("formContainer"); // Form wrapper
const formShortcode = formContainer.innerHTML; // Save original HTML for reset
// Open/close chat bubble
toggle.addEventListener("click", () => windowBox.classList.toggle("active"));
close.addEventListener("click", () => {
windowBox.classList.remove("active");
// Reset form by restoring original HTML
formContainer.innerHTML = formShortcode;
// Show intro text again
chatIntro.style.display = "block";
// Re-add submit listener for new form instance
const newForm = formContainer.querySelector("form");
if (newForm) {
newForm.addEventListener("submit", () => {
// Hide intro text immediately on submission
chatIntro.style.display = "none";
});
}
});
// Fluent form submission listener. Switch out this code with other contact form listeners.
const form = formContainer.querySelector("form");
if (form) {
form.addEventListener("submit", () => {
// Hide intro text when form is submitted
chatIntro.style.display = "none";
});
}
});
</script>
<?php
});
Switch out the Fluent Forms listener with another form plugin or generic listener
            // Fluent form submission listener
            const form = formContainer.querySelector("form");
            if (form) {
                form.addEventListener("submit", () => {
                    // Hide intro text when form is submitted
                    chatIntro.style.display = "none";
                });
            }

            // Contact Form 7 submission listener
            const cf7Form = formContainer.querySelector(".wpcf7 form");
            if (cf7Form) cf7Form.addEventListener("submit", () => { chatIntro.style.display = "none";   });

            // WPForms submission listener
            const wpForm = formContainer.querySelector(".wpforms-form");
            if (wpForm) wpForm.addEventListener("submit", () => { chatIntro.style.display = "none"; });

	     // Formidable Forms
            jQuery(document).on("frmFormComplete", function() {
            if (introText) introText.style.display = "none"; });

            // Gravity Forms submission listener
            const gfForm = formContainer.querySelector(".gform_wrapper form");
            if (gfForm) gfForm.addEventListener("submit", () => { chatIntro.style.display = "none"; });

            // Ninja Forms submission listener
            const nfForm = formContainer.querySelector(".nf-form-cont form");
            if (nfForm) nfForm.addEventListener("submit", () => { chatIntro.style.display = "none"; });

            // Generic fallback listener (works for any plugin)
           chatContainer.addEventListener("submit", function(e) {
           // Hide intro text on submission
           if (chatIntro) chatIntro.style.display = "none"; });
Step 3 – Test the Behavior
- Intro text is initially shown with form.
- After submission → only the thank-you message shows.
- When closed → form resets, intro text comes back.
- Lightweight → no third-party services needed.
Conclusion
You now have a lightweight chat bubble in WordPress that works with your existing form plugin. It looks like a live chat, but works offline – perfect for freelancers, small businesses, and anyone who wants to offer quick contact without complexity.
This approach is:
- Simple – no SaaS or extra plugins.
- Fast – pure CSS + JS + your form plugin.
- Flexible – style it however you like.
Customizations.
Conditional Logic for Displaying the Chat Bubble.
The following conditionals are added just after the opening of the PHP.
An example.
add_action('wp_footer', function () {

    // ===== Conditional Logic =====
    // Switch out this condition or add your own conditions.
    // Example: only show chat bubble on page ID 10
    if (!is_page(10)) return;

    ?>
    <style>
    /* Chat Bubble Styling follows.....*/
1. By Page or Post ID
Show the bubble only on certain pages:
add_action('wp_footer', function () {
    if (!is_page([10, 25, 42])) return; // Only show on pages with IDs 10, 25, 42
    // ...rest of chat bubble code here...
});
2. By Post Type
Show the bubble only on posts or a custom post type:
add_action('wp_footer', function () {
    if (!is_singular('post')) return; // Only show on single blog posts
    // ...rest of chat bubble code here...
});
3. By User Role
Show the bubble only to certain user roles:
add_action('wp_footer', function () {
    if (!current_user_can('subscriber')) return; // Only for subscribers
    // ...rest of chat bubble code here...
});
4. By Device Type (Optional)
Show the bubble only on mobile or desktop:
add_action('wp_footer', function () {
    if (wp_is_mobile()) {
        // ...chat bubble code for mobile only...
    }
});
Using a Shortcode [custom_chat_bubble]
- This method lets you place the chat bubble anywhere: page, post, Gutenberg block, or widget.
- You still use all the same plugin listeners or generic fallback as in the baseline code.
1.Add the original PHP code to your theme’s functions.php or a custom plugin and switch out the following:
function custom_chat_bubble_shortcode() {
    ob_start();
    ?>
    <!-- Insert your chat bubble HTML, CSS, JS here -->
    <!-- Include the same plugin listeners or generic fallback as baseline -->
    <?php
    return ob_get_clean();
}
add_shortcode('custom_chat_bubble', 'custom_chat_bubble_shortcode');
2. Replace the Fluent Forms listener if using another plugin, or rely on the generic fallback.
3. Place [custom_chat_bubble] wherever you want the chat bubble to appear.
The full code:
<?php
// Shortcode for a chat bubble with a contact form
function custom_chat_bubble_shortcode() {
ob_start();
?>
<style>
/* Chat bubble styling */
.custom-chat-bubble {
position: fixed;
bottom: 20px;
right: 20px;
background: #2563eb;
color: #fff;
border-radius: 50%;
width: 60px;
height: 60px;
display: flex !important;
align-items: center;
justify-content: center;
font-size: 28px;
cursor: pointer;
box-shadow: 0 4px 10px rgba(0,0,0,0.3);
z-index: 9999;
transition: background 0.3s;
}
.custom-chat-bubble:hover { background: #1e40af; }
.custom-chat-window {
position: fixed;
bottom: 90px;
right: 20px;
width: 350px;
max-width: 95%;
background: #fff;
border-radius: 12px;
box-shadow: 0 6px 20px rgba(0,0,0,0.25);
display: none;
flex-direction: column;
overflow: hidden;
z-index: 10000;
}
.custom-chat-window.active { display: flex; }
.custom-chat-header {
background: #2563eb;
color: #fff;
padding: 12px 16px;
font-weight: bold;
display: flex;
justify-content: space-between;
align-items: center;
}
.custom-chat-header span { cursor: pointer; font-size: 20px; }
.custom-chat-body {
padding: 15px;
font-size: 14px;
color: #333;
max-height: 450px;
overflow-y: auto;
}
.custom-chat-body p { margin-bottom: 10px; }
</style>
<div class="custom-chat-bubble" id="customChatToggle">💬</div>
<div class="custom-chat-window" id="customChatWindow">
<div class="custom-chat-header">
Leave a message
<span id="customChatClose">×</span>
</div>
<div class="custom-chat-body">
<p id="chatIntro">
Thank you for contacting us.<br>
Leave a message and we will get back to you.
</p>
<div id="formContainer">
<?php echo do_shortcode('[fluentform id="10"]'); ?>
</div>
</div>
</div>
<script>
document.addEventListener("DOMContentLoaded", function () {
const toggle = document.getElementById("customChatToggle");
const windowBox = document.getElementById("customChatWindow");
const close = document.getElementById("customChatClose");
const chatIntro = document.getElementById("chatIntro");
const formContainer = document.getElementById("formContainer");
const formShortcode = formContainer.innerHTML;
toggle.addEventListener("click", () => windowBox.classList.toggle("active"));
close.addEventListener("click", () => {
windowBox.classList.remove("active");
formContainer.innerHTML = formShortcode;
chatIntro.style.display = "block";
const newForm = formContainer.querySelector("form");
if (newForm) {
newForm.addEventListener("submit", () => {
chatIntro.style.display = "none";
});
}
});
const form = formContainer.querySelector("form");
if (form) {
form.addEventListener("submit", () => {
chatIntro.style.display = "none";
});
}
});
</script>
<?php
return ob_get_clean();
}
add_shortcode('custom_chat_bubble', 'custom_chat_bubble_shortcode');
The chat bubble still shows up in the bottom right corner.
Making the chat bubble appear inline at the place you insert the shortcode instead of always fixed in the bottom right. This requires a small CSS tweak.
Here is how:
Change the CSS positioning.
.custom-chat-bubble {
    position: relative;  /* changed from fixed */
    display: inline-flex !important;
    align-items: center;
    justify-content: center;
    background: #2563eb;
    color: #fff;
    border-radius: 50%;
    width: 60px;
    height: 60px;
    font-size: 28px;
    cursor: pointer;
    box-shadow: 0 4px 10px rgba(0,0,0,0.3);
    transition: background 0.3s;
}

.custom-chat-window {
    position: relative; /* changed from fixed */
    display: none;      /* hidden by default */
    flex-direction: column;
    overflow: hidden;
    margin-top: 10px;   /* space below the bubble */
    width: 100%;        /* optional: expand to container */
    max-width: 400px;   /* optional max width */
}
Optional container wrapper
You can wrap the shortcode in a div if you want more control:
<div class="custom-chat-shortcode-wrapper">
    [custom_chat_bubble]
</div>
This lets you center the bubble, add margins, or control width.
- Bubble now appears exactly where you put the shortcode in your page content.
- Clicking it still toggles the chat window, intro text hides on submission, and the form resets when closed.
WP Footer vs Shortcode Versions
1. WP Footer Version
- The chat bubble code is added directly to your theme’s footer via
add_action('wp_footer', …). - Always loads on every page (unless you add conditional logic).
- Lightweight and fast, ideal if you want the bubble globally on the site.
- No need to manually insert anything into posts or pages.
2. Shortcode Version
- The chat bubble code is wrapped in a shortcode, e.g.,
[custom_chat_bubble]. - You can insert the bubble only on specific pages or posts by placing the shortcode where you want it.
- Useful for testing, staging, or showing the bubble in a limited context.
- Functionality (form reset, intro text hiding, plugin listeners) is the same as the WP Footer version.
Resource used ChatGPT. Additional examples might later on be added on to this tutorial.
Using a Fluent Forms form to trigger Fluent Support
Check out this resource: https://fluentsupport.com/docs/fluent-form-integration/
Be sure to add the Fluent Forms ID that you want to use with Fluent Support in the chat bubble PHP code and into Fluent Support.
Troubleshooting & Common Questions
The chat bubble shows, but no contact form appears.
If you see the blue chat bubble on your site but no contact form opens, check these points:
Confirm that the Fluent Forms plugin is active.
The form won’t appear if the plugin is deactivated or missing.
If using functions.php file. Make sure you added the entire code block from the tutorial to your child theme’s functions.php. Adding it directly to a theme which will be updated will remove the code on update.
The whole section between needs to be included — not just the line with the shortcode.
add_action('wp_footer', function () {
?>
...
<?php
});
Check your form ID.
If your form’s ID is 10, the line should look like this:
<?php echo do_shortcode('[fluentform id="5"]'); ?>If the form doesn’t show there either, the issue can be inside Fluent Forms (not the chat bubble code).
Clear your cache.
If you’re using a caching or optimization plugin, clear your cache and reload the page.
How can I change the chat icon?
You can replace the 💬 icon inside the chat bubble with any emoji or even a custom SVG.
Option 1 — Use an emoji
In your code, find this line:
<div class="custom-chat-bubble" id="customChatToggle">💬</div>and change it to:
<div class="custom-chat-bubble" id="customChatToggle">✉️</div>Option 2 — Use an SVG icon
For a cleaner, scalable icon, replace it with this:
<div class="custom-chat-bubble" id="customChatToggle">
    <svg xmlns="http://www.w3.org/2000/svg" width="28" height="28" viewBox="0 0 24 24" fill="none" stroke="white" stroke-width="2" stroke-linecap="round" stroke-linejoin="round">
        <path d="M4 4h16v16H4z"></path>
        <polyline points="22,6 12,13 2,6"></polyline>
    </svg>
</div>
This creates a simple white envelope that stays centered in the bubble.